New Features

These are the new features that were introduced in the major upgrade v10.0.3 and in 10.0.4. There is a separate section for instruction on Multicam. Click here for the Multicam section.
Updating
First, do not update while working on a project. No matter how tempting, always, always finish the project you’re working on before updating. If you want to keep the previous version of FCP make sure you back up the application onto a separate drive or disc. Also, if you’re working on a project that you think you may need to go back to at a later time, it would be advisable to, in addition to backing up your older version of the software, to also back up the appropriate Events and Projects for that version. Once you open the Events and Projects folder in the new version of FCP, they will be updated and will no longer open and be accessible in older versions.
Autosave
A new autosave function has been implemented that saves the events and projects every 15 minutes. This does not save a new incremental copies every 15 minutes that would allow you to go back to some point two days ago; it’s simply a recovery tool, so if the system fails and it has not autosaved, you will not lose more than your last 15 minutes of work. FCP now has the ability to detect a corrupted project and a dialog will appear when it sees it, which lets you restore the project from the backup.
Clip Skimming
Clip Skimming (Option-Command-S) is a very handy tool if you’re doing compositing work. It allows you to skim individual clips in the Timeline, even clips that are covered by other clips so that you can see it unobstructed. The Clip Skimmer is independent of skimming, which means that it will still function in the Angle Editor for instance, if skimming is switched off. Another important feature of the clip skimmer is that when skimming a clip in the Timeline, the Dashboard will display clip timecode rather than project or Timeline timecode.
Relinking
Another new important new feature is the ability to relink missing media, or even to relink to a different file after it has been altered or moved. On p75 the note indicates that reconnecting was not possible in FCP. It now can be done either in the Event Browser or in the Timeline. Select the item or items that have the garish red warning, and use File>Relink Event Files... If you have an item in a project selected it will say Relink Project Files... You can and right-click on an event in the library to access the relink function. Relinking a project file allows you to relink to a file with a different name, just for that project. Generally, relinking in the browser will be more useful as it will relink all instances of the clip that are used in any projects and of course in any keyword collections. If you want to swap a file in a project you can relink a project clip and this will not effect any other clips and will add a new clip to the Event Browser.
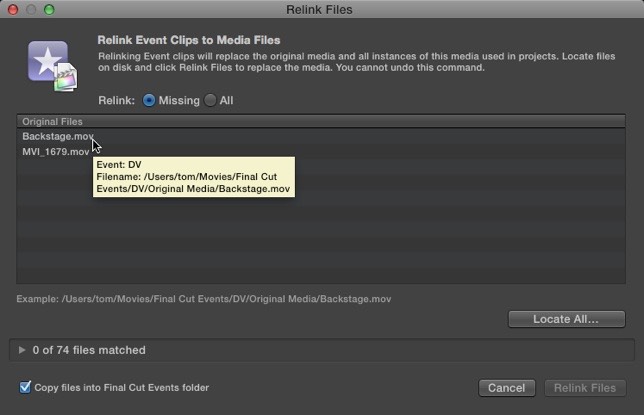
Relink Dialog
The clip names that appear in the upper panel are not the names of the clip in the browser, but the original file names. If you hold the pointer over a clip name the tooltip will tell you the location path to where the file should be.
Notice the buttons at the top that let you select Missing clips or All clips. At the bottom of the dialog is the checkbox to copy the file to the event or not. This is similar to the import dialog. Use the button to Locate All, which takes you the navigation dialog. Find the file you want to relink to and press Choose. The file will move to the bottom half of the dialog. Files that need to be relinked that are in the same file-path will automatically be relinked. Other files in other locations can be selectively added using the dialog. Once you have all the files to relink loaded in the bottom portion of the window, click the Relink Files button. Relinking files in the Event Browser will also automatically relink the to missing files that are in projects.
Color Correction
Many improvements have been made to the Color Board. The first is that it can now be used with greater precision. The numeric values in all three panels can be scrubbed with the scroll wheel of your mouse. In addition exact values can be entered in these boxes.
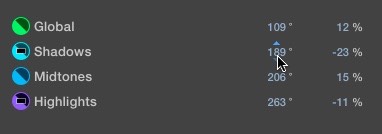
Color Board Controls
There are also new keyboard shortcuts available for selecting the next or the previous color correction, and a keyboard shortcut for toggling the inside or the outside of a selection in the color board. None of these have assigned shortcuts, but they available in the Commands/Customize window. Also if the Color Board is open Control-Command E, Control-Command-S, and Control-Command-C will switch from Exposure to Saturation or to Color, which is kind of handy.
If you have multiple corrections applied, you now have the ability to reorder in the Inspector by dragging them above or below other corrections, just as you can reorder effects.
There are also new keyboard shortcuts for the video scopes.
For the Histogram Control-Command-H
For the Vectorscope Control-Command-V
For the Waveform Monitor Control-Command-W
Also is the Color Board is the active panel the following shortcuts will switch between the three control panels:
For Exposure Control-Command-E
For Saturation Control-Command-S
For Color Control-Command-C
To cycle through the panels Control-Tab (Shift-Control-Tab goes backwards)
An excellent feature is the the video scopes remember the last used scope, so when you use Command-7 to open the scopes you don’t always open to the Histogram, but if you leave it on the Waveform Monitor it will reopen to the Waveform Monitor. The scopes can also be adjusted for brightness and to make them monochrome from the appearance menu (the light switch). You can also switch off the Guides in the WFM and the Skin Tone Indicator if you want, though I’m not sure why you’d want to.
Keyer
In addition to the controls briefly described for the Keyer beginning on p255, Apple has introduced some advanced chroma keying tools to improve color sampling and edge quality. There is now a Color Selection color wheel with separate luma controls below it and sliders to control roll-off.
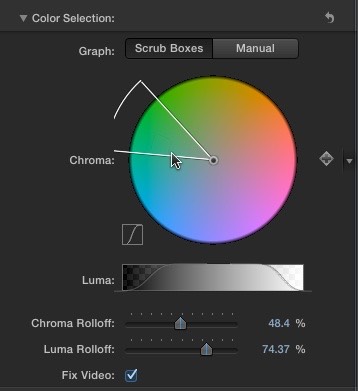
Keyer Color Selection
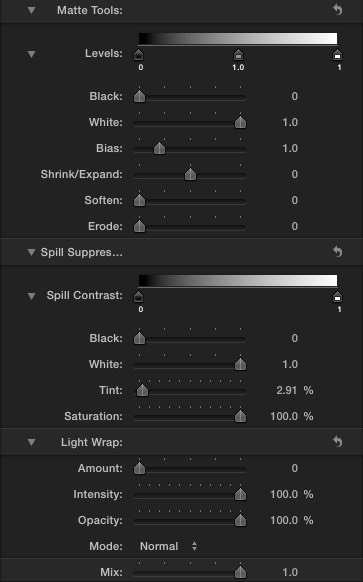
The Color Wheel allows you to select the core color your key, and using the angle controls allow you to adjust the edge transparency. You can use the Color Wheel separately to select your color or in conjunction with the original tool set, which work remarkably well in many instances. For more difficult keys these tools will give you finer control. Together with the Color Selection tool you also have Matte Tools, which allow you to adjust the selected area; Spill Suppression, which lets you knock down reflected light from the screen that falls on the subject; and Light Wrap, which takes the background luminance from the underlying image and tries to adjust the edges of the foreground object to match that. It takes a great deal of practice and skill to use these tools effectively, but they are very powerful additions to the Keyer.
Advanced Tools
Photoshop
The ability to import and edit layered Photoshop graphics has been added to FCP. As in legacy versions of FCP, Photoshop effects have to be rasterized before they can be brought into the application. Previously all Photoshop were automatically flattened on import. This is no longer the case. When a layered Photoshop file is imported, the layers remain intact and separate. Make sure the file is in 8-bit RGB. 16-bit will imported flattened, and CMYK will not import at all. The file appears with a little layer icon.

Photoshop Layer Icon
The Photoshop file can be edited into any project. It behaves like a Compound Clip. Double click it to open it into the Timeline, either from the Event Browser or from an open project. When the file is open in the Timeline you can access the layers and manipulate them as you like using the transform function. You can change the transparency and reorder the layer stack. You can use the transform functions, and even add effects to individual layers. You can even add other elements like titles and other graphics, however when you do that the Photoshop can no longer be opened in Photoshop and the stacks icon will change to a regular compound clip icon.
Note: If you filter the browser based on Media Type>Stills, the layered Photoshop files will not appear. Strange but true. Photoshop files appear under Clip Type.
New Titles
There are two titles, which serve well as placeholder titles, in addition to being accessed from the Media Browser, can also be accessed from the Edit menu or by using Control-T for the Basic Title or Shift-Control-T for Basic Lower Third. Both are 10 seconds long by default. They simply pop onto the screen, sit there, and then pop off. You can of course add fades and do all the other text and positioning you want. You should be warned though that while Basic Title is centered in the screen, Basic Lower Third is in the lower left corner of the title safe area of the screen. The placement is set for widescreen projects, so is actually off the screen when applied to standard definition projects.
Search
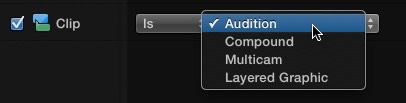
In previous versions text added in Notes to Favorites and Rejects could not be located through a search. This has been corrected so all text is searchable using the Command-F function. There is also a new filter in the search command, to search for Clip Type, which lets you search for Audition, Compound, Multicam clips, and layered Photoshop files.
Search for Clip Type
Broadcast Monitoring
As mentioned on the Changes page there is now third-party broadcast monitoring via PCIe and using Thunderbolt devices from companies such as AJA, Black Magic, or Matrox. It also requires Mac OS 10.7.2 or later. You turn this on in the Playback preferences, after which you select it in the Window menu by choosing A/V Output. There is no FireWire output.
Clip Date and Time
This can now be batch offset for multiple clips by selecting them and changing them using the Modify menu and selecting Adjust Content Created Date and Time.

Adjust Content Created Date and Time
Notice two things in this dialog. This is not an absolute change for selected clips. By this I mean, you are not setting an exact date and time for all the selected clips. The other clips will change the amount of time, days or months or hours, relative to the amount you are changing the first clip. The other important thing to note is that this is not in the Undo queue. Once you change it, Command-Z will not help you. This is a destructive function as it’s changing the metadata on the QuickTime file on your computer.
Playback Preferences
There are new Playback preferences. In addition to a new preference to optimize material used in multicam clips, there are also new preferences for controlling how the application responds to dropped frames.

Dropped Frames Warning
The bottom preference specific warns if performance is being effected because of poor hard drive performance. You’ll most likely to see this when working with complex multicam clips.
XML
XML is now version 1.1 and has support for exporting primary color grades, effect parameters, and audio keyframes.
Changes in 10.0.4
10.0.4 is largely a bug fix and performance update, not the major update that was 10.0.3. However, there are four important changes in this version of FCP, most undocumented by Apple:
1. FCP is now able to import media from cameras that record in frame rates of 59.94 (e.g. 1080p60) and 50 (e.g. 1080p50). Previously media in these formats was not detected by the camera import function and had to be rewrapped using Clip Wrap or Media Converter before importing. Now the media can be imported directly using FCP’s camera import function.
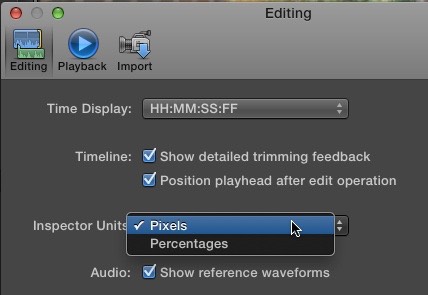
2. There is a new Editing preference to that allows you select how units are displayed in the Inspector, whether the Transform units are displayed as pixels or as percentages. Previously the display used some arcane reference unit that showed pixels as a ratio of the frame size. Now you have the choice of showing actual pixel values or percentages of the frame. Personally I like to use pixels as these are absolute values and are ones I’m used to from working in other graphics and editing applications.
Inspector Units
3. The default audio setting for new projects has been changed from Surround to Stereo 48 kHz. This is another good change as it’s what most users will be working with. In addition exporting Surround output when the media was stereo was creating problems. Unless you’re working with and mixing surround output, you should now stick to the default project settings.
4. The importing preference has been changed. In the preference window and when you go to import footage, either as a file or from a camera, the checkbox for "Analyze for stabilization and rolling shutter" has been removed. The rest of the checkboxes (Analyze for balance color, Find people, etc) are all still there. This is an excellent change in my view as these analyses were a significant choke point in background processes after import. Analyses for stabilization and rolling shutter can be done for any clips at any time, by selecting them and choosing Analyze and fix from the shortcut menu.
To skip to the 10.0.6 update page click here.
Copyright © 2013 South Coast Productions