Transitions in Final Cut Pro and Final Cut Express
A common question that comes up for new users of Final Cut Pro or Final Cut Express is, "Why aren't my transitions working?"
You try to drag a transition drag to an edit point and you see the icon with a small X next to it, or you try to apply the transition with the keyboard shortcut and it fails or creates a one frame transition. Why does this happening? The answer is usually a simple one. There isn't enough media in clips beyond the edit point to perform the transition. The shots must overlap; frames from both shots must appear on the screen simultaneously. For a one-second transition, both shots have to have one second of media that overlaps with the other shot. These frames come partly from inside the clip, and partly from media beyond the edit point. The extra video frames, those beyond the edit point separating the two shots, are called handles.
There needs to be extra media available to create the overlap for the transition, as shown in this figure.
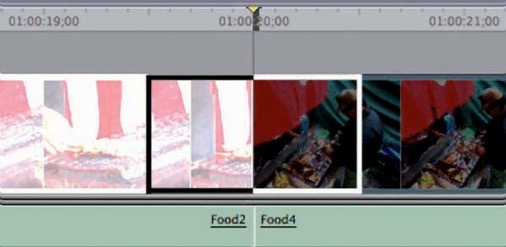
The pale shot on the left has to overlap the dark shot on the right by half the length of the transition, and vice versa. If that media does not exist, you can't do the transition. Final Cut usually assumes as a default that the transition takes place centered around the marked edit point, not that it ends at the edit point. Therefore, to execute the default one-second transition, you need at least half a second, 15 frames in NTSC (12 in PAL), of available media after the Out point on the outgoing shot and 15 frames in front of the In point of the incoming shot.
In this case the error appears there is not enough available. Unless you think of it ahead of time - and many times you don't - you'll have to deal with it when you're fine-tuning your edit. Often you'd rather not deal with transitions while you're laying out your sequence, leaving them until you've laid out the shot order.
Often extending the media will push it into another shot, producing a flash frame during the transition, something to be avoided. To be able to put in transitions, we'll have to trim the Out point of the outgoing shot on the left and the In point of the incoming shot on the right. You could do this by dragging the ends of the shots to make them shorter, but that would leave a hole in the Timeline. Instead, you should use the Ripple tool to shorten the shots.
Select the Ripple tool from the Tools palette, or use the keyboard shortcut RR.
With the Ripple tool, click just to the left of the edit point as in this figure
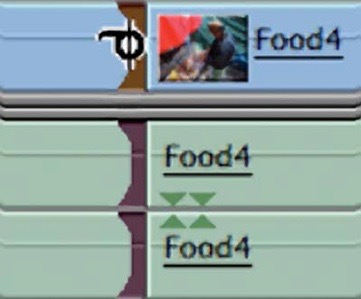
With Ripple active, type in -15 for 15 frames and press the Return key.
Click on the right side of the edit point or use the U key to toggle from rippling one side, to roll edit, and to ripple the other side of an edit point. This time type +15 and press Return to ripple the edit point half a second. You have now rippled half a second off the end of the first shot and half a second off the beginning of the second, leaving this as handles, so that there is enough room for the transition.
Copyright © 2006 South Coast Productions