OTHER SIZES
You’re not always making a graphic that needs to fit in the video format. Sometimes you’re making a graphic that is much larger, one you want to move around on to make it seem as if you’re panning across the image or zooming in or out of the image. To do this, you need to make the image much greater than your video format, perhaps 2,160x1,602 pixels or more.
If you are working with a Photoshop layer image, you still should squeeze the image down to non-square pixels before you bring it into FCP. To do this, rather than using pixel values, use percentages and reduce the height of the image to 90% or, if you want to be anally precise about it, 89.886%. Again, you should not resize these images if they are single layer images without Photoshop transparency. FCP understands these are square pixel images brought into a CCIR601 world and will handle them appropriately.
If they are PS layered files with transparency, FCP treats these as separate sequences and does not adjust for CCIR601 pixels. The rules of the road are probably unnecessarily complex, but the bottom line is if it’s a single-layer file, let FCP do the resizing; if it’s a PS file, squeeze it before you import it.
The easiest way to work with Photoshop files that you want to lay over video is to create your PS files over transparency, PS’s checkerboard background. This transparency will be honored when you import the file into FCP. It’s important to understand that PS files come into Final Cut as separate sequences. This means that when you bring a PS file with multiple layers, all its layers remain intact as separate layers in a FCP sequence. There each layer can be animated and affected separately.
The only time Photoshop files do not import as a sequence is when they are made up of a single background layer or are saved as flattened images or in some other file format, such as PICT or TIFF.
Because it’s simpler to work with a single-layer file, I often convert my PS files to PICT images, preserving the transparency information in an alpha channel, a simple procedure and easy enough to create a PS Action for. I retain the PS file to make changes after the following procedure.
Collapse the PS layers so that they merge over transparency.
Command-click the layer to select the contents of the layer.
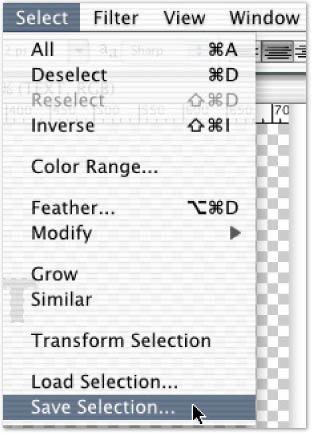
Go to the menu bar to Select>Save Selection (Figure 1) to bring up the Save Selection dialog box.

Figure 1
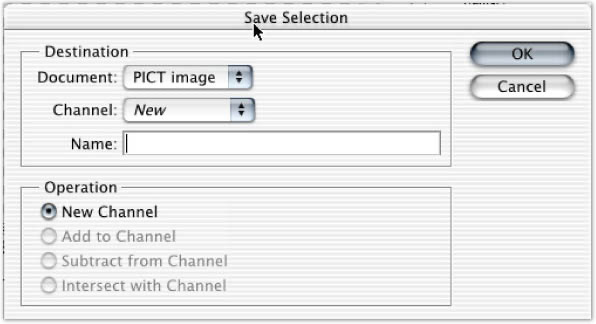
Save it as a new channel, as shown in Figure 2.

Figure 2
If you look in your Channels tab, usually behind the Layers window, you’ll see that you now have four channels, the three color channels — Red, Green, and Blue — and a channel called an Alpha channel (Figure 3).

Figure 3
This is a grayscale representation of opacity. Whatever is white in the alpha channel will be opaque on the screen; whatever is black in the alpha channel will be transparent. Various shades of gray in between will define greater or lesser amounts of opacity.
Copyright © 2004-2006 South Coast Productions